Our Wedding Photo Wall

I’ve always loved the look and feel of a gallery wall in a home. There’s something warm and inviting about it. I’m not usually a photo person. In fact, in my last apartment, I had exactly one photo as decor — the photo of Mike and me the day we got engaged. I knew that I’d want to put some of our wedding photos up in our new home, so I decided on a large, symmetrical gallery wall in our bedroom. I’m so, so happy with how it turned out! I received quite a few questions while sharing the process on Instagram, so I thought I’d share how I did it and answer the most frequently asked questions.
The way that our bedroom is laid out, we have a “hallway entrance”. So, you cross the threshold into the room and immediately have the bathroom on the left. There’s about a 1.5 foot wall and then the door to Mike’s closet. On the right is about a 9 foot wall, which was the perfect spot for our photos. I’m a chronic re-arranger and re-decorator, so I didn’t want to do this gallery wall on a wall that could potentially be used a different way in the future. I didn’t want to pigeon-hole myself with our bedroom layout by making an entire wall unusable, so our “hallway wall” was the best option! It creates a really cool statement as soon as you step into our room and gives a great purpose to that otherwise empty space.
I like the drama of a floor to ceiling gallery wall with large photos. It creates a bold statement without being too overwhelming, like if you had 25 smaller photos or something. I used these frames from IKEA (16″ x 20″ frames) and printed the photos through Costco. I’m really happy with the quality of the prints. The photos were printed in 16×20 size in their lustre finish.
And here’s what it looks like redone in our new home:
As I anticipated from the start, the hardest part was measuring out the wall and determining the right spacing. My gallery wall is symmetrical, so spacing was essential. If you do a wall like this, you don’t have to be precise with measuring.
Here’s a little guide for all the measurements that I collected before I started marking up the wall.

Here comes the difficult and maybe confusing part:

Measurements you need to get:

total wall width
total wall height
(if not filling the entire wall, gather the width and height of the space you want the gallery)
frame width
frame height
vertical space between the top of the top frame and the ceiling AND between the bottom of the bottom frame and the baseboard
horizontal spacing between the left side of the frame and the start of the wall AND the right side of the frame and the end of the wall
vertical spacing between the frames you will hang
horizontal spacing between the frames you will hang
To start, gather your total wall measurements. For example, let’s say the wall is 100 inches wide and 80 inches tall. Then I’ll take the frame, let’s say it’s 16 inches wide and 20 inches tall.
To determine how many of those frames will fit, I’ll do some simple math:
100 inches wide/16 inches wide = 6.25 — I can fit up to six frames across the wall
80 inches tall/20 inches tall = 4 — I can fit up to three frames up the wall (to leave space between frames)
So, I’ve decided to do 5 frames across and 3 frames up. Now to figure out the spacing between the wall and the frame and between the frames, I’ll do some more calculations.
16 inches wide x 5 frames = 80 inches of space covered (of the 100 inches of wall width)
I  have 20 inches leftover of width for spacing. There will be SIX areas of spacing – from the left end of the wall to the first frame, between all 5 frames, and from the right end of the last frame to the end of the wall. Take your 20 inches of leftover width and divide by 6 to get 3.333 inches of spacing. If you want a more precise number, you can choose to do the outside spacing (from end of wall to frame) in a larger number, say 4 inches. So, you’ll have 4 inches on the far left and 4 inches on the far right, which is 8 inches. Then you only have 12 inches of spacing for between the five frames, which means each frame will be spaced out 3 inches apart. (Determining the spacing will be totally up to how simple you want the process to be)
(are you completely lost yet?)
 
Do that same sort of thing to determine vertical spacing.
Once you know the spacing for everything, you start measuring! I made a little diagram on a piece of paper to keep all the numbers straight. It was a simple as taking a ruler and a pencil and measuring out where the frames should start and end. I lightly traced all four sides of the frames onto a piece of foam board,which I then cut out with an exacto knife. Now I had a perfect replica of the size of the frame, which I could hold on the wall to trace. When all the frames were traced out, I could fully envision what the finished wall would look like. Once I had all the traces (which you could also do with tape or something else), it was time to measure out where the nails go.
I used nails mostly because I find them to be way, way easier than anything else. 3M Command strips are the bane of my existence – they never hold up and always leave a gross stickiness on the wall after. This is just my opinion and experience. I would much rather put 16 nail holes in a wall than deal with those things. If you prefer the strips, go for it!
The frames that I used had a built in “nail rest” centered on the back, so it was as simple as measuring out where that nail rest was located and marking on the wall inside the drawn frame. Do that 15 more times and then you’re done 😂😅
A ruler (or better yet, a yardstick!), tape measure, pencil and good eraser, level, good nails and a hammer will be your friend during this process!
QUESTIONS:

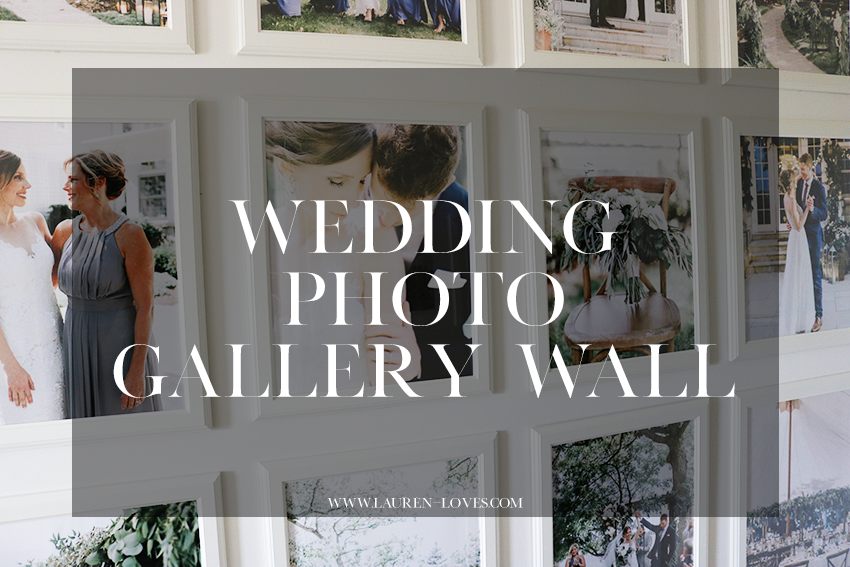
How did you decide what pictures went where?

Before ordering the photos for print, I created a mock-up in Photoshop of the wall. I went through and selected a variety of photos from our collection – Mike and me, bridal party, family, and details. I wanted a healthy mix of all of them! Once I selected my favorites, I put them into the Photoshop mockup to lay them out. I started in the top right corner and filled in from there. I made sure to space out the different types – I would skip a space or two before doing another details photo, for example. You could also print low quality versions of the photos on standard printer paper to do a layout like this on the floor (or the wall!). It’s good to do a trial run to make sure you’ve selected the photos you like and have the arrangement you want. A lot of finding the balance in where you hang what photos will come down to you visually seeing it done. With a symmetrical gallery wall like this, it’s really easy to swap a couple photos into different positions on the wall because they all fit.I see that some of the photos are behind your bedroom door when it’s open. Why did you do that?
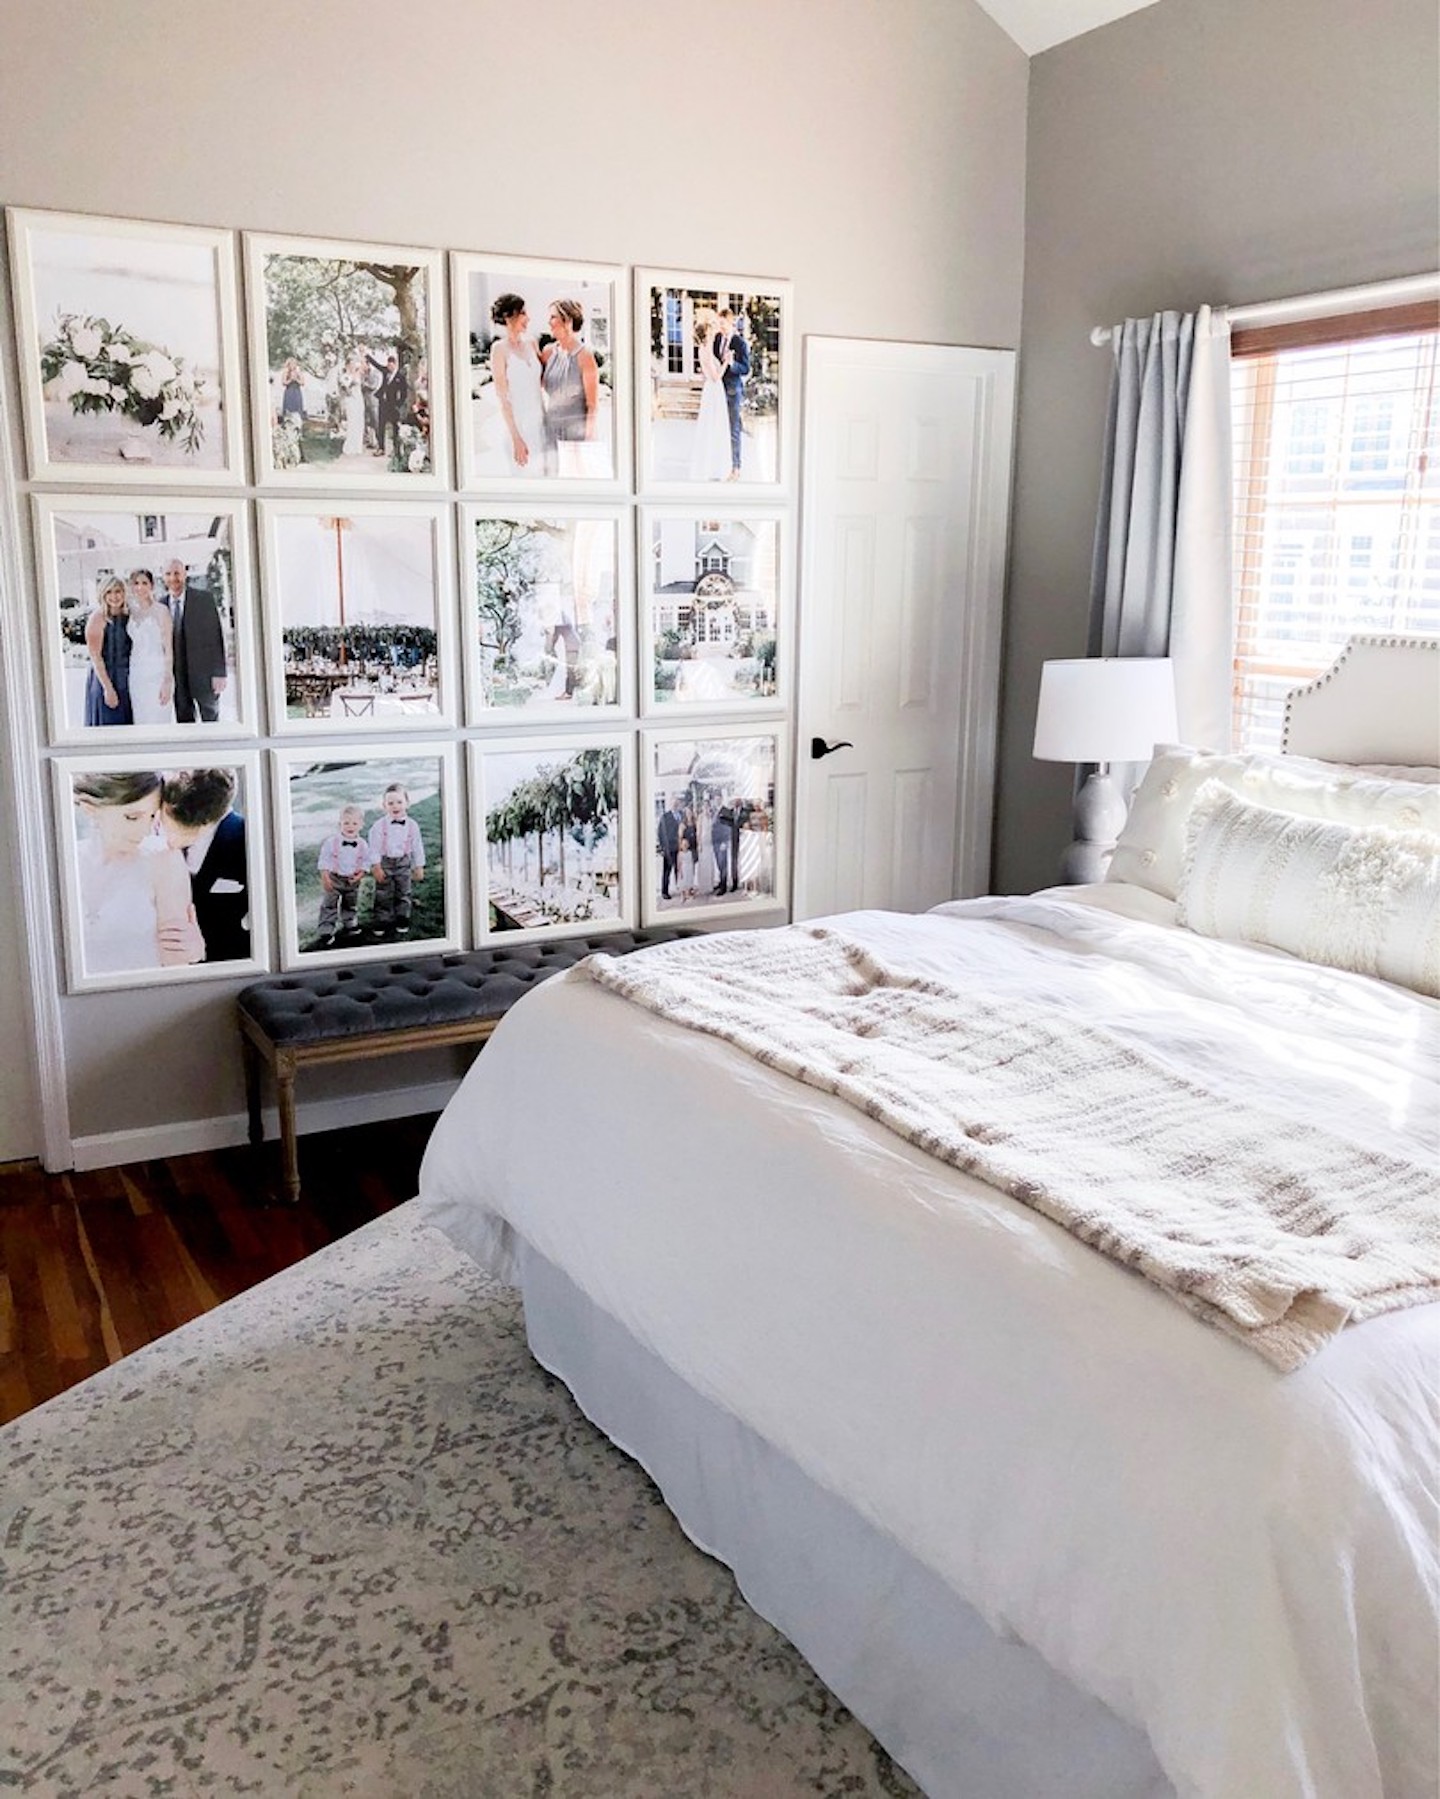
I wanted to do a full wall! It would’ve looked funny to stop the gallery at the door when it’s open and we shut the door often enough that it’s not an issue. The doorstopper in the baseboard stops the door from hitting the frames just behind it, as well. Again, it’s all a matter of personal preference!

Did you have any rhyme or reason to the photos you chose?

I just went through and chose some of my favorite, which was hard to do! I didn’t want too many “portrait” style – I like the more lifestyle, emotional ones from our day. There was no issue with color balancing or making sure they all flowed together because of the colors that we had going on that day — any photo that I chose from our wedding album would’ve fit seamlessly into the wall, which made it really easy to choose! I chose all vertical photos, so that there wasn’t any weird cropping or sizing issues.

Who took these photos?

Our incredible wedding photographer, Jordan Maunder!

Is the glass in the frames plexi glass or glass?

It’s plastic!

How did you hang on the wall to prevent shifting?

I haven’t had issues with them moving much yet, but you could do one of those Command velcro strips on the bottom to keep them in place! Since you can’t ever get straight on with our wall, you can’t see if anything is slightly crooked, which is what I like about it!

Reason to use large format pictures with no matting versus matting?

This is totally a personal preference. I wanted to make as big of an impact as I could on the wall, so I printed photos the size of the frames and didn’t use the included matting.

Will you print more pictures moving forward? Would you start to mix and match the photos in the wall?

I’m not sure! I will likely keep them all the same (unless I want to swap some out for different wedding photos, at some point) since they all flow so well together. If I wanted to change it up, I would probably change the whole wall!

Total cost of the project?

I believe it was somewhere in the $300 range. The frames themselves were $200 something (I bought 20 of them and used the other four elsewhere in our home) and the printing was under $200. The price, of course, is completely adjustable depending on what you do!

Why did you do it in your bedroom and not a more highly-trafficked area in your home?

There’s a few reasons why I chose our bedroom. First, I like to keep a fairly “minimal” home. I use the word minimal lightly here, since I still have a good amount of “stuff” and decor everywhere. But, I don’t like to hang things just to hang things or to have decor on every single wall. I think there needs to be a healthy balance between blank space and filled space in a room. Our bedroom was definitely more empty than it was full, so I knew I wanted to add something else in there. That wall and my idea for a floor to ceiling gallery fit perfectly!

As far as not putting it in our living space, we didn’t have the room! I’m hoping to share our main living area here in the next week or two, so you’ll see what I mean. I already have a “gallery” of sorts made up of mirrors and frames, so adding a photo gallery wall would be too much, even if we did have the wall space for it.

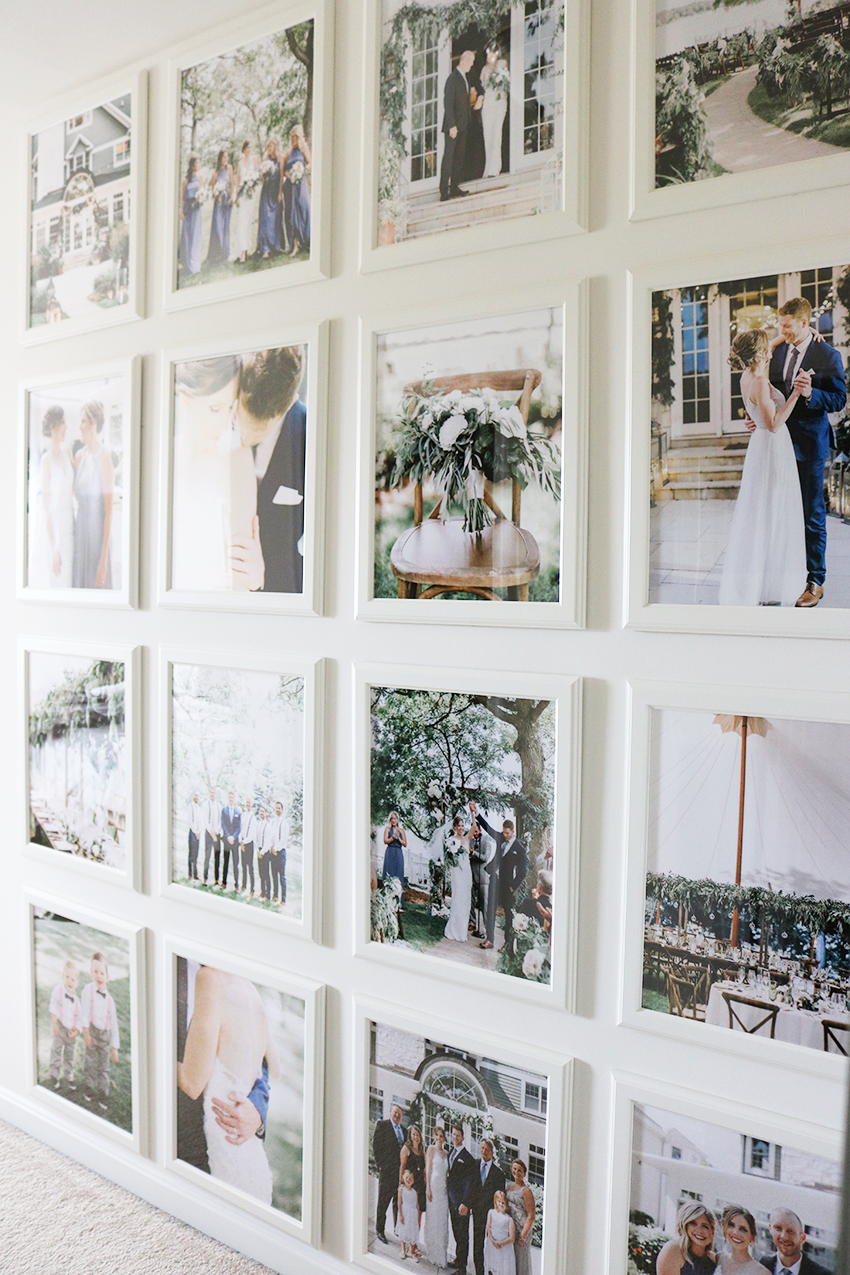
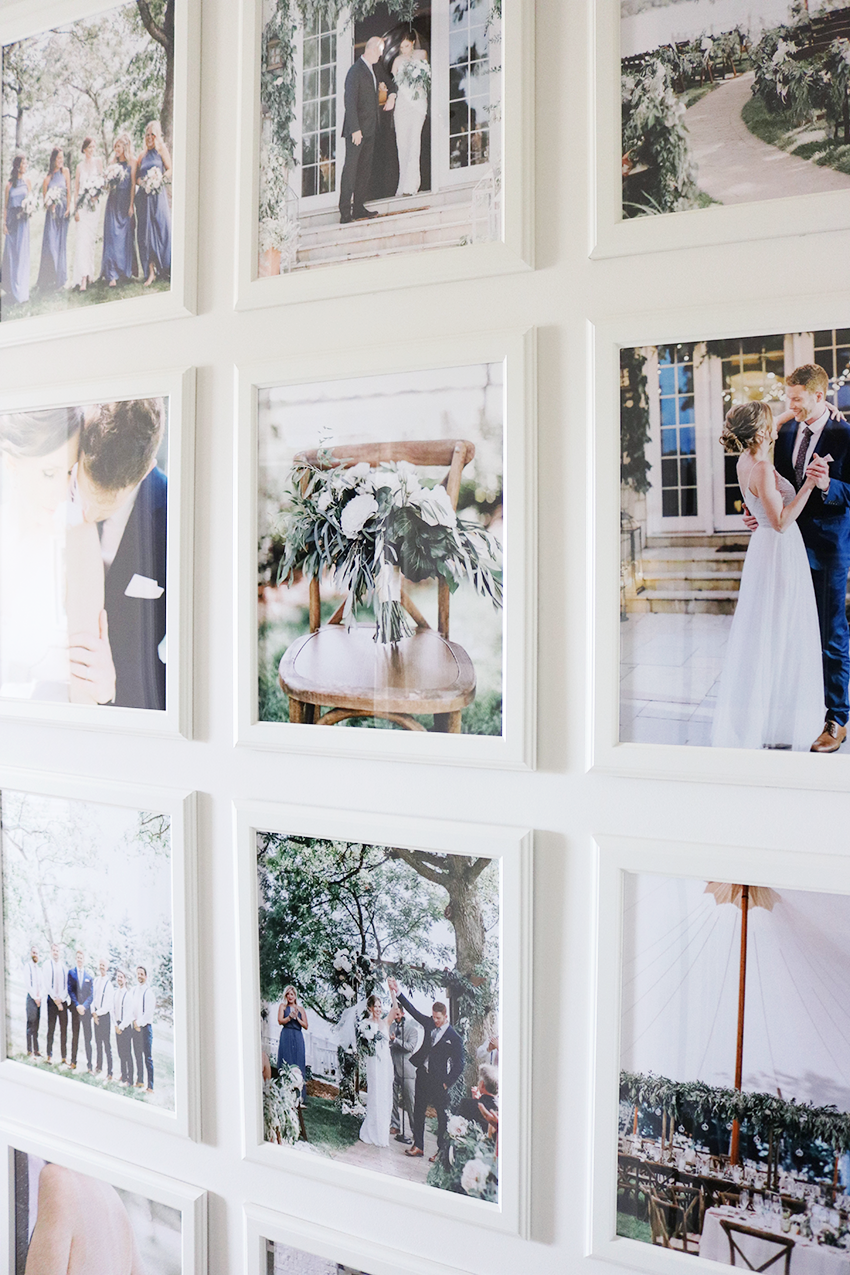
Did you edit the photos at all or crop them to fit?

I didn’t do a single thing to them! They’re professional photos from our wedding, so I didn’t need to adjust anything. I chose all vertical shots, so that cropping didn’t come into play.

If I did something like this, would I have to have the frames all in the same orientation? 

You can do whatever you want! I don’t really believe in following the “rules” with things like that. If you like the look of mixed frames on a symmetrical gallery wall, go for it! For this wall and this purpose, I knew I wanted all the same frames. Since I have large prints of so many photos, I wanted to keep everything else really simple.

Why did you go to the floor with the wall? 

As mentioned in the post, I like the drama of a full-wall gallery. It’s all a personal preference thing – you do it how you like it and how it will work well in your home!

Did you consider doing black and white photos?

I didn’t. The color scheme from our wedding fits perfectly into our decor style in our master bedroom, so there was no issues there. If you like the idea of a large gallery wall like this but have photos will all different colors, black and white would be a more subdued way to do it!

Have more questions? Leave a comment!

Hi there!

Lauren Bown Lifestyle Blog is an online destination where I share my personal style, beauty finds, and bits of life in hopes to inspire other women to feel good in their skin and find the beauty in the ordinary.

browse the archives

shop my instagram

Leave a Comment

11 Comments

  1. 10.18.17

    Love it! I'll have to make a trip for some frames!

  2. 10.18.17

    wow, looks amazing! perfect attention to detail!

  3. 10.18.17

    fun pics
    love the one with lights reflected behind u on glass door of house

    is that your brother?!

  4. 10.19.17

    This is beautiful!
    But in all honesty, I would have loved to see a wide angle shot of your whole wall! I'd like to see what it looks like in the entirety! I love it anyway, though! Great work!

  5. 5.19.22
    katie said:

    Hi! I got these same frames! They are wonderful! Where did you print the larger pictures at? Thanks!

    • 5.20.22
      Lauren said:

      They were printed at Costco!